Removing Rust from Metal: Proven Techniques for Perfect Results
- Laserverse

- Jun 25, 2025
- 14 min read
Understanding Why Your Metal Items Keep Rusting
Ever found yourself wondering why that brand-new set of patio furniture is already showing orange spots, while your decades-old indoor tools look almost new? It's a common frustration, but the mystery behind it all boils down to a simple chemical reaction: oxidation. When iron or steel gets cozy with both oxygen and moisture, it tries to return to its original, more stable form—iron oxide, which we all know as rust.
Think of it this way: water is the perfect sidekick for this reaction, acting as a conductor, or electrolyte, that helps the process along. A piece of steel left in the dry desert air will fare much better than the same piece in a humid, coastal town. That’s why your garden shears can start showing a fine layer of rust after just one rainy night outdoors. The moisture completes the circuit and gets the corrosion party started.
The Key Environmental Culprits
Certain conditions in the environment can really put the pedal to the metal on the rusting process. If you know what they are, you can stay one step ahead and protect your metal goods before the damage sets in.
Humidity: This one’s a biggie. The more moisture in the air, the faster metal will rust. Anything stored in a damp basement, a garage without climate control, or an outdoor shed is in a constant fight against moisture. Once the humidity level climbs above 60%, you’re in the fast lane for rust formation.
Salt: Saltwater is like an energy drink for rust. The chloride ions found in salt are incredibly aggressive and speed up oxidation like nothing else. This is the reason why vehicles, bridges, and other infrastructure in coastal areas face such a relentless battle with corrosion. It’s been a significant challenge for a long time here in California, where the salty marine air takes its toll on everything from cars to major structures. You can learn more about the long history of metal treatment in California's coastal regions to see just how deep the issue runs.
Temperature Fluctuations: Those quick shifts from cool to warm might seem harmless, but they can cause condensation. When a cool metal surface suddenly warms up, it pulls moisture from the air, creating a thin film of water. This little bit of condensation is all it takes to kickstart the rusting process, even in a place that feels dry.
Which Metals Are Most at Risk?
It's important to remember that not all metals are created equal in the face of rust. Iron and most types of steel are the main offenders because, well, they contain iron. On the flip side, you have materials like stainless steel, which has chromium mixed in to create a protective, invisible layer. Metals like aluminum and copper don't "rust" in the same way iron does, but they can still tarnish or corrode over time.
Before you grab any tool or chemical for removing rust from metal, figuring out what you're working with is the most important first step. Using the wrong method for the metal type can do more harm than good, turning a small rust spot into a much bigger problem.
Setting Up Your Workspace for Success
Jumping into a rust removal project without a bit of prep is a surefire way to get frustrated. Taking a few moments to organize your workspace will save you from a major cleanup mission later on. More importantly, it’s a crucial step for your safety, especially when you’re removing rust from metal with chemicals or power tools.
A great spot is always a well-ventilated area, like a garage with the door wide open or a covered patio. This isn’t just about nasty fumes; rust dust gets everywhere, and you don’t want a fine red powder coating everything you own. It's a good idea to lay down a drop cloth or some heavy-duty plastic sheeting to catch drips, rust flakes, and any metal bits that come loose.
Assessing the Damage Before You Begin
Before you even think about grabbing a tool, get up close and personal with the rusty item. Are you looking at a light, powdery film on the surface, or is it dealing with deep, flaky pits of corrosion? Here's a quick test: gently poke the worst-looking areas with a screwdriver. If the metal still feels solid, you’re probably dealing with surface rust. If it’s soft or crumbles under pressure, the corrosion is more serious and will need a more forceful approach.
If you’re working on cast iron, particularly a piece you found at a flea market or one that might have been in a fire, check it for warping or hidden cracks. A warped pan will never sit flat on your stove, and a cracked one is a safety risk that’s just not worth it. This initial check is your roadmap; it tells you exactly what kind of fight you’re in for and helps you pick the right tools for the job.
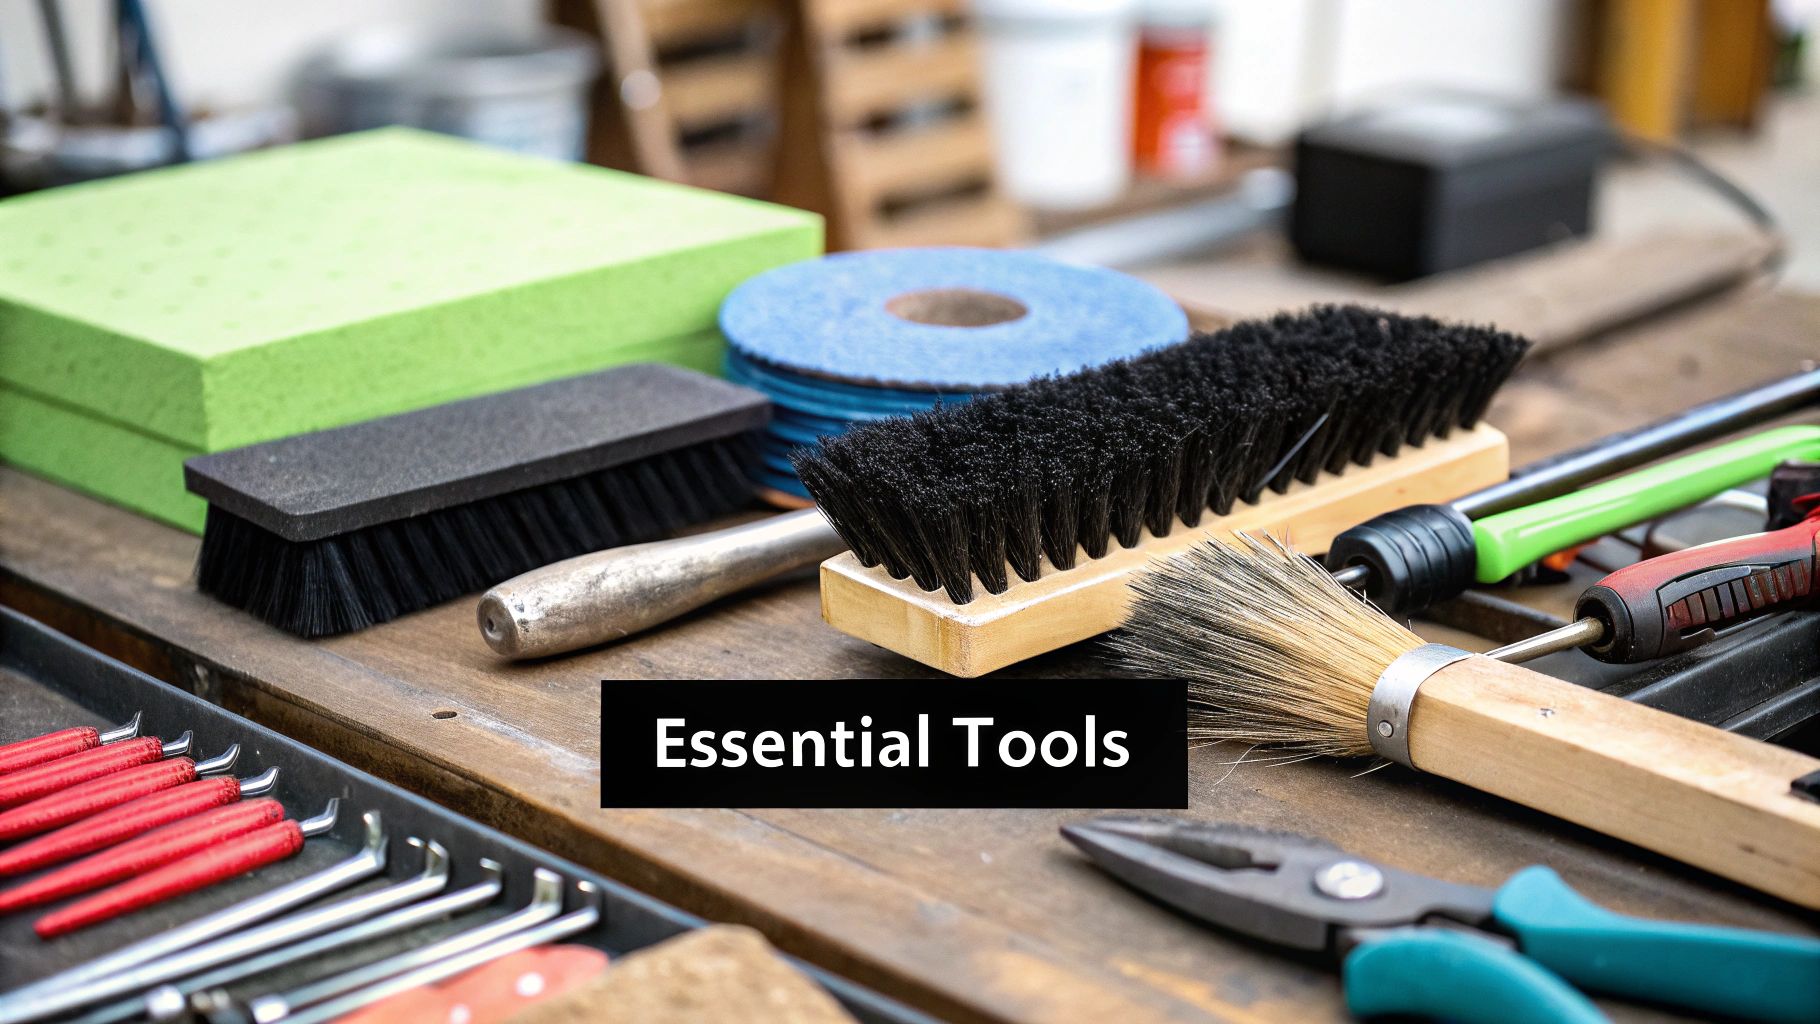
Gathering the Right Tools and Gear
Having all your equipment ready to go makes the whole process feel less like a chore. You don't need a professional-grade workshop, but a handful of key items will make a world of difference.
Protection First: This is non-negotiable. Always start with safety glasses or goggles, chemical-resistant gloves, and a decent dust mask or respirator. Your health comes first.
Abrasives: A good assortment of wire brushes (both the kind you hold and attachments for a drill), some steel wool, and sandpaper in various grits will get you through most situations. Having coarse 80-grit for heavy rust and finer 220-grit for finishing is a great starting point.
Cleaning Supplies: You’ll want plenty of rags or paper towels, a bucket, and a good degreasing soap. You need to clean the metal before you start and after you finish. A clean surface is essential for any paint or protective coating to stick properly afterward.
Chemical Solutions That Actually Remove Rust
When you're dealing with stubborn rust, sometimes good old-fashioned scrubbing just won't cut it. That's where chemical rust removers come in. Instead of physically scraping rust away, these products use a chemical reaction to dissolve the iron oxide, often saving you a ton of time and effort. There are a lot of options out there, but understanding what’s in the bottle and how to use it is crucial for removing rust from metal without causing any damage.
The chemical rust remover market is a big deal, especially in places like Canada with its varied industrial and automotive needs. These products, which often rely on acids or special inhibitors, offer a completely different path compared to abrasive methods. You can learn more about how they fit into the bigger picture by checking out some insights on the rust remover industry.
Choosing the Right Chemical for the Job
Not all chemical solutions are made the same. The best one for you will depend on the type of metal, how bad the rust is, and how quickly you need it gone.
Mild Acids (Vinegar & Citric Acid): For light surface rust, especially on smaller parts you can soak, common household acids like white vinegar or citric acid can be surprisingly effective. They’re less harsh, making them a safe first choice. Just be prepared to wait—you'll need to submerge the item, and it can take anywhere from a few hours to a full day.
Phosphoric Acid: You'll find this as a key ingredient in many commercial rust converters. It reacts with iron oxide to create a stable, black compound called ferric phosphate. This not only gets rid of the rust but also leaves behind a paintable, protective layer that helps stop future rust. It's a fantastic option for items you plan on painting later.
Commercial Rust Removers: These are typically your fastest and most powerful choice for heavy-duty rust. They might contain stronger acids like hydrochloric or oxalic acid, which means you absolutely must follow the safety instructions. Good ventilation and proper protective gear aren't just suggestions; they're essential.
To help you decide which chemical approach is right for your project, here’s a quick comparison of some popular methods.
Chemical Rust Remover Comparison Guide |
|---|
A comprehensive comparison of different chemical rust removal methods, including effectiveness, safety considerations, cost, and best use cases. |
Method Type | Effectiveness Rating | Safety Level | Cost Range | Best For |
|---|---|---|---|---|
White Vinegar/Citric Acid | Low to Medium | High | Very Low | Light surface rust on small, soakable items. |
Phosphoric Acid Converter | Medium to High | Medium | Low to Medium | Items that will be painted; converts rust to a protective layer. |
Commercial Rust Remover | High | Low | Medium to High | Heavy, widespread rust on durable metals. |
Gel-Based Removers | Medium to High | Medium | Medium | Vertical surfaces or areas that can't be soaked. |
This table shows that while stronger chemicals work faster, they also demand more care and a higher budget. Gentler, DIY options are great for smaller jobs where you have more time.
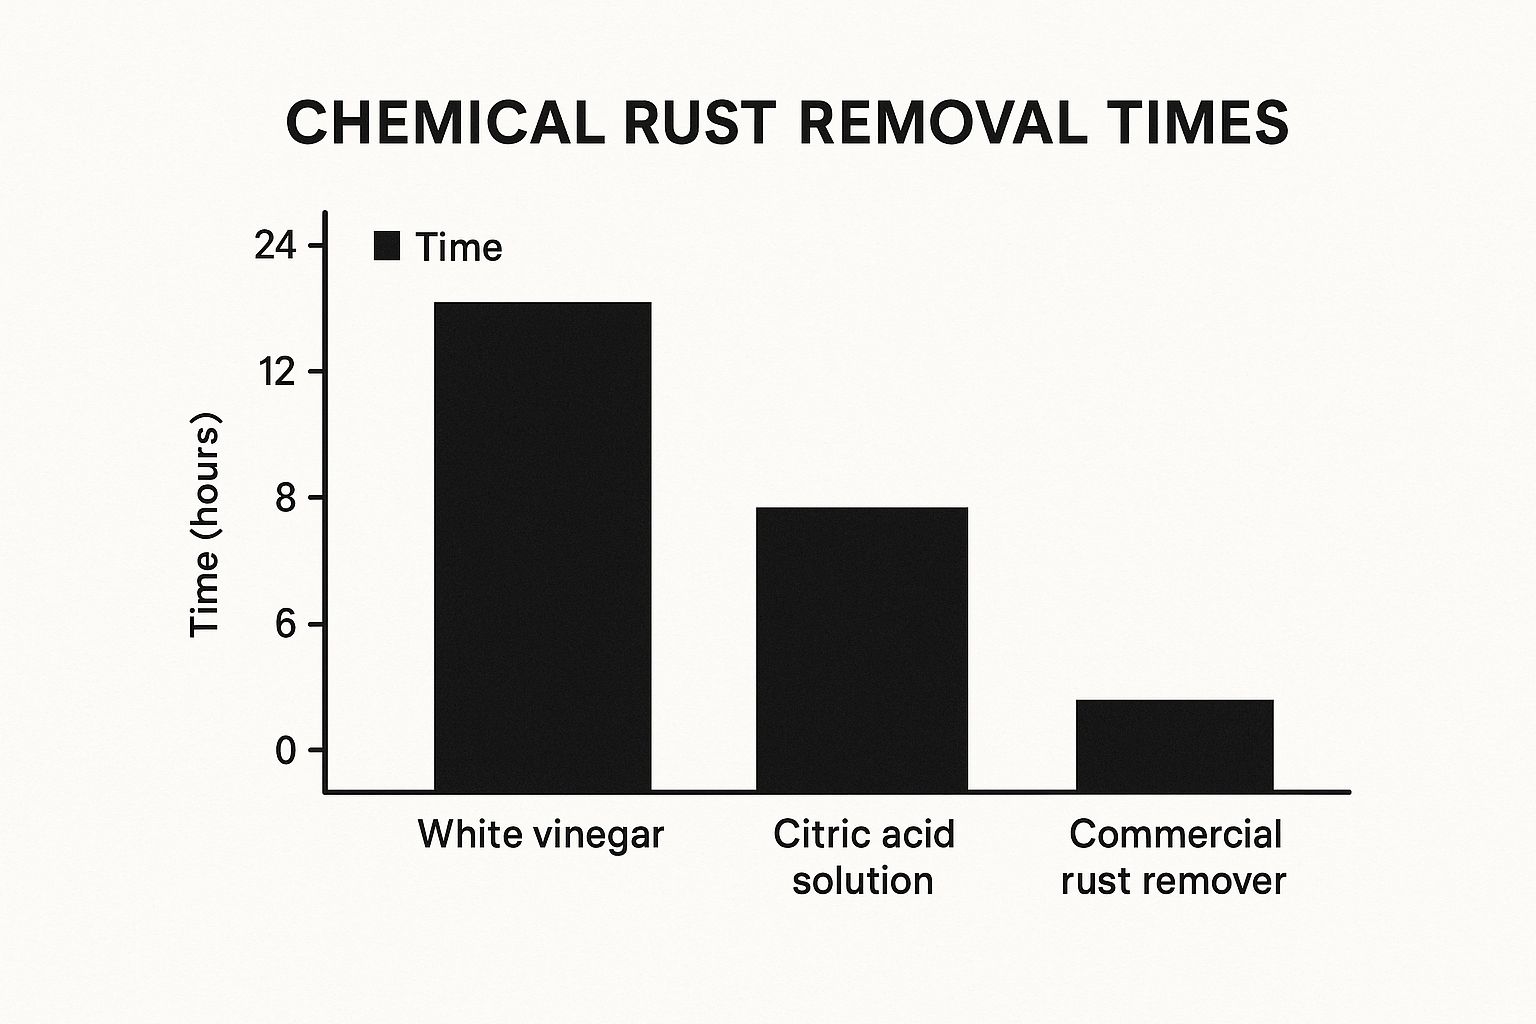
As you can see, there's a big difference in the time commitment between gentle household solutions and purpose-built commercial products.
Application Tips From the Pros
Getting the application right is everything. If you rush it or skip steps, you could end up with patchy results or even damage the metal. A critical final step after using any chemical remover is to neutralize the surface. A quick rinse with water and baking soda will stop the chemical reaction from continuing and eating into the clean metal.
For those really stubborn patches, sometimes a combination of a chemical soak followed by some light scrubbing with a wire brush does the trick. This two-pronged approach often gives you the best of both worlds. While these methods are tried and true, newer technologies are offering even more precision. You can see how a [handheld laser rust removal](https://www.laserverse.ca/post/handheld-laser-rust-removal) tool can target rust with incredible accuracy, using no chemicals or abrasives at all.
Hands-On Mechanical Techniques for Every Project
Sometimes, the best way to deal with rust is to get your hands a little dirty. Mechanical or abrasive methods for removing rust from metal are all about direct action. You get immediate feedback and a real sense of control as you physically strip away the corrosion. There's something incredibly satisfying about watching that clean, bare metal reappear from underneath the grime. This approach puts you in the driver's seat, letting you decide exactly how much material to take off and when the job is done.
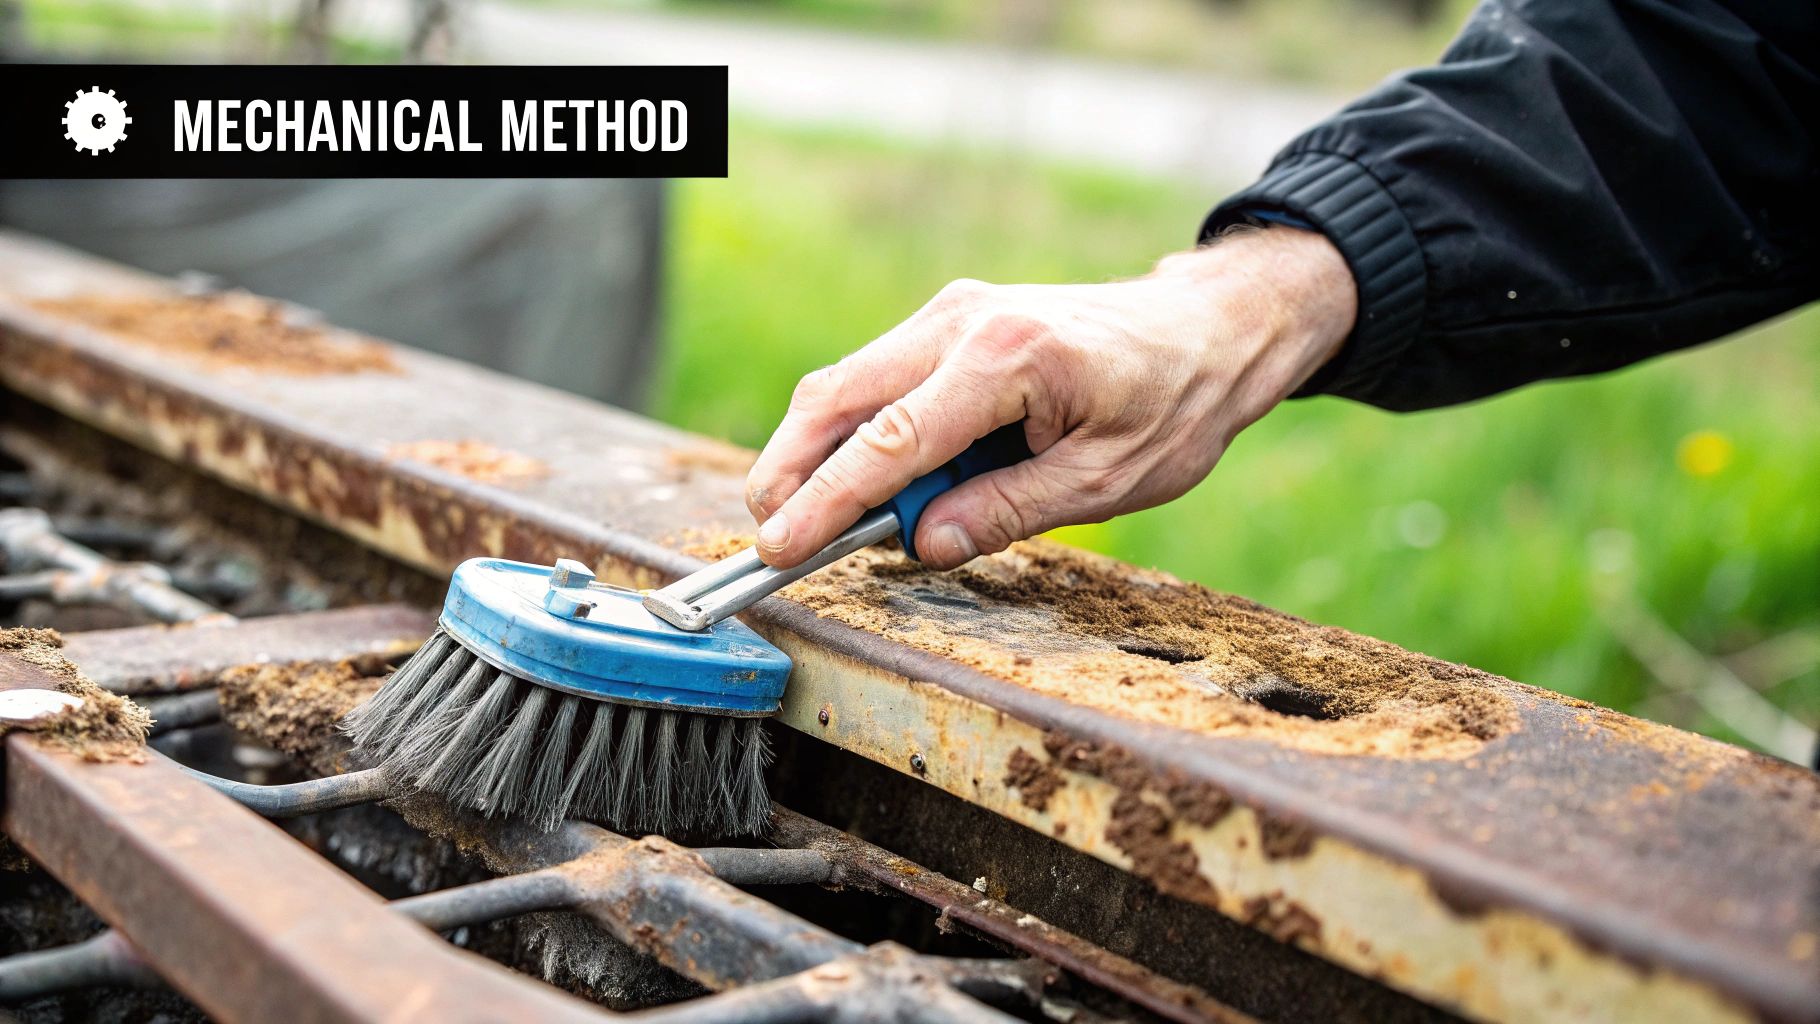
From Simple Scrubbing to Power Tools
What's great about mechanical rust removal is that it scales to fit any job. You don't need a huge workshop to start. For light surface rust on something sturdy like a cast iron pan, you might just need some coarse sea salt and a cloth to buff it out. When things get a bit more stubborn, sandpaper or steel wool can work wonders. A pro tip I've learned is to begin with a more aggressive, lower grit like 80-grit to cut through the worst of the rust, then switch to a finer 220-grit or higher to smooth everything out for a perfect finish.
When you're up against a bigger project or more serious corrosion, it's time to bring in the power tools. An angle grinder fitted with a wire wheel can make quick work of heavy rust on a car bumper or an old metal gate. The trick is to apply even, consistent pressure as you move across the surface. If you lean too hard in one spot, you could gouge the metal. Let the tool do the heavy lifting. For more detailed work in tight spaces where a large wheel won't fit, a Dremel with a small wire brush or sanding bit gives you fantastic precision.
The Right Tool for the Right Job
Matching your tool to the task is absolutely critical. If you use a harsh wire wheel on a delicate piece of thin sheet metal, you're asking for trouble—you'll probably warp it or tear right through. On the other hand, trying to clean a heavily rusted trailer frame with a small piece of sandpaper will have you working for days with little to show for it.
Here’s a quick breakdown to help you pick the right tool:
Steel Wool & Sandpaper: These are your best friends for light rust, final polishing, and projects where you need to be careful not to damage the original surface.
Wire Brushes (Handheld & Drill Attachments): This is your go-to for medium-level rust on durable items. They're excellent for getting into corners and cleaning up textured surfaces where rust likes to hide.
Angle Grinders & Sanders: Save these for the heavy-duty jobs on thick, solid metal. They remove material fast but demand a steady hand to avoid damaging the underlying metal.
No matter which tool you choose, the end goal is the same: get the piece back to bare, shiny metal. Once you're there, a thorough cleaning is a must before you apply any kind of protective coating. This hands-on method is often the most direct path to a perfectly smooth, rust-free surface that's ready for its next chapter.
Cutting-Edge Laser Technology for Precision Results
While hands-on scrubbing and chemical soaks certainly have their place, there's a more advanced method for removing rust from metal that offers incredible precision and efficiency. I'm talking about laser cleaning, a non-contact technique that uses focused beams of light to vaporize rust, paint, and other contaminants without ever touching the metal underneath. Think of it as a high-tech eraser that only works on the unwanted gunk, leaving the original surface completely unharmed.
The science behind it is a process called laser ablation. The machine fires short, powerful pulses of light that are absorbed by the rust layer. This absorption happens so fast that the rust instantly turns into a gas, which is then whisked away by a suction system. The bare metal below reflects the laser's energy instead of absorbing it, which means the process is self-limiting. The laser effectively stops cleaning the moment it hits a clean surface, so there's no risk of damaging the part itself. This level of control is why it's a go-to for restorers working on delicate classic car parts or priceless historical artifacts.
The Clear Advantages of Going Laser
The benefits of laser rust removal go far beyond its cool-factor and precision. It's a real game-changer for several reasons, which is why it's gaining so much traction in professional shops.
Eco-Friendly: Unlike chemical baths or sandblasting, laser cleaning produces no secondary waste. You don't have harsh chemicals to dispose of or abrasive media to sweep up, making it a much cleaner and greener choice.
Damage-Free Results: Because there’s no physical scrubbing or abrasive material involved, the integrity of the original part is perfectly maintained. This is crucial when you're working with soft metals or components where every millimetre of thickness counts.
Unmatched Precision: A laser can be focused to a super fine point, letting it clean intricate designs, tight corners, and complex shapes that are simply impossible to reach with brushes, grinders, or sanders.
Here's an animation that shows exactly how the laser ablation process strips away contaminants layer by layer.
As you can see, the laser beam vaporizes the top layer of rust while the base metal stays cool and untouched. It's this targeted energy transfer that makes laser cleaning so effective and safe for the material you're trying to save.
Is Laser Cleaning Right for Your Project?
While this technology was once only seen in high-end industrial settings, it's becoming more accessible. For a one-off DIY project, hiring a professional service like Laserverse is your most practical option. Sure, the upfront cost might be higher than a can of rust remover from the hardware store, but for valuable or delicate items, the investment is often worth it for the perfect results and the peace of mind that comes with zero surface damage.
If you want to see how this technology can be applied in different scenarios, you might find our guide on [laser rust removal](https://www.laserverse.ca/post/laser-rust-removal) interesting, as it gets into specific use cases. Ultimately, the decision comes down to balancing the cost against the value of the item and the quality of the finish you're after.
Protecting Yourself and Your Environment
Getting that last bit of rust off a metal part is a great feeling, but making sure you do it safely is what truly counts. Whether you're dealing with powerful chemical removers or sending rust dust flying with a grinder, protecting yourself and your workspace is non-negotiable. This is about more than just opening a window; it's about setting up a proper, safe work zone from the start.
Essential Personal Protective Equipment (PPE)
Your first and most important line of defence is always what you're wearing. Don't even consider starting one of these projects without covering the essentials.
Eye Protection: At a bare minimum, you need safety glasses. But if you’re firing up power tools that throw debris or using chemicals that could splash, you really should upgrade to sealed safety goggles or even a full-face shield. Your eyes are irreplaceable.
Respiratory Protection: Fine rust particles and chemical fumes are serious business. For any mechanical removal like grinding or sanding, a NIOSH-approved N95 respirator is a must-have. When you’re working with acid-based chemicals, you'll need a respirator equipped with cartridges specifically rated for organic vapours and acid gases.
Hand and Skin Protection: A solid pair of chemical-resistant gloves, usually made from nitrile or neoprene, will keep harsh solutions off your hands. If you're doing heavy-duty grinding, swap them for some tough leather work gloves. Wearing long sleeves and pants is also a simple but effective way to prevent skin contact and irritation.
Ventilation and Environmental Responsibility
Proper ventilation isn't just about staying comfortable—it's about clearing the air of potentially harmful particles. If you're working inside, you can create a cross-breeze with a couple of fans. For projects with strong chemicals, though, a dedicated fume extractor is a much better and safer option.
Thinking about disposal is another critical part of the job. You should never pour used chemical solutions down the drain or dump them on the ground; they need to be treated as hazardous waste. Collect them in a clearly labelled, sealed container and take them to your local municipal hazardous waste facility.
This responsible mindset is mirrored in large-scale industrial operations. For instance, California's scrap metal recycling industry handles about 7 million tons of material annually, with strict rules for managing rusted metals from vehicles and appliances. You can get a better sense of how scrap metal is handled at a state level to see the bigger picture. By properly managing waste from your own project, you’re doing your part to protect our shared environment.
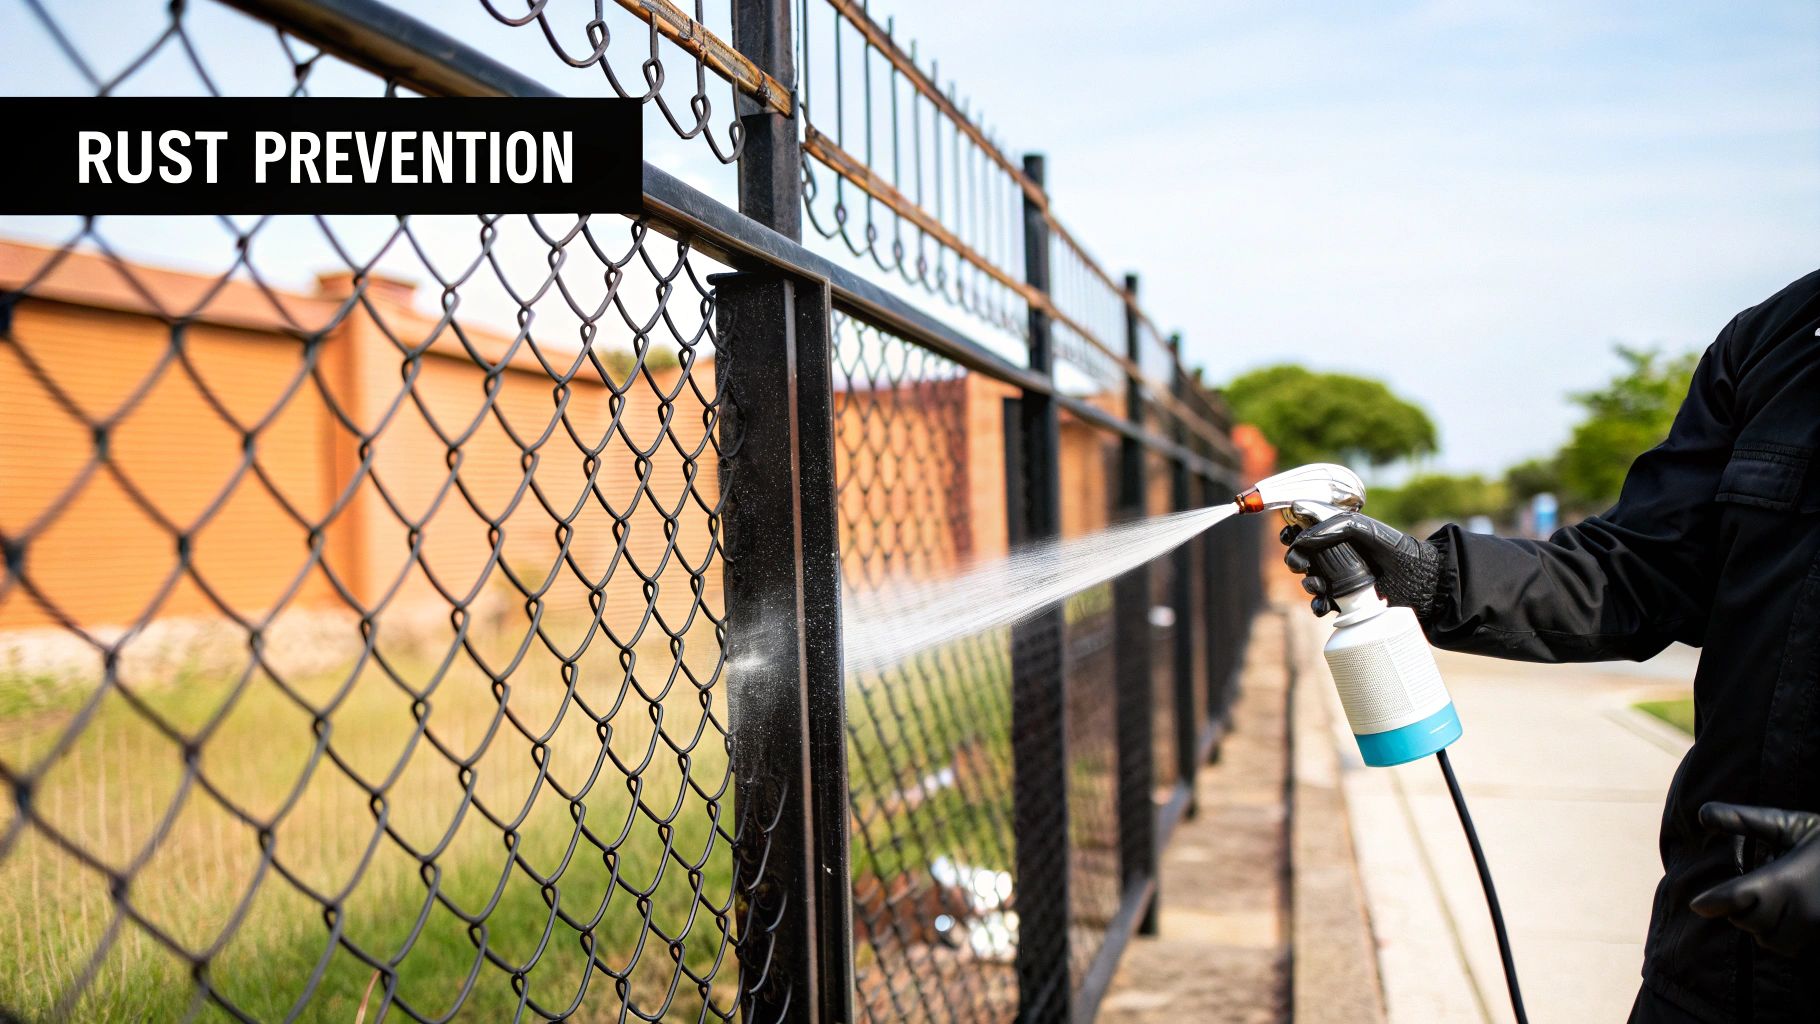
Protecting Your Investment After Rust Removal
You’ve put in the work, and the ugly orange rust is finally gone, revealing clean, bare metal underneath. It's a satisfying moment, but the job isn't finished yet. Getting the rust off is only half the battle; keeping it from making a comeback is where the real success lies. This is the stage where many projects fail, as exposed metal is incredibly vulnerable and can start to re-oxidize almost immediately—sometimes in just a few hours if the air is humid.
The Critical Clean-Up and Neutralization Phase
Before you even think about applying a protective coat, the surface has to be perfectly clean. This means more than just a quick wipe-down. If you used a chemical rust remover, acidic residue might be lingering on the surface, ready to eat away at the metal even under a new coat of paint. To stop this, you need to neutralize the surface. A simple paste of baking soda and water, scrubbed lightly and then rinsed thoroughly with clean water, is a classic trick of the trade.
After neutralizing and rinsing, you need to dry the piece completely. Don't just let it air dry. Use a clean, lint-free cloth, followed by a heat gun or even a hairdryer on a low setting to make sure every last bit of moisture is gone. Any trapped moisture is an open invitation for rust to return.
Choosing the Right Protective Armour
With a perfectly clean and dry surface, you’re ready to apply a protective coating. The right choice depends entirely on the item's purpose and its environment. A garden trowel that lives outside needs a much tougher defence than a decorative metal sign that hangs indoors.
Primers and Paints: For most projects, a high-quality, rust-inhibiting primer is your best friend. It creates a strong bond with the metal and provides a stable base for your topcoat of paint. Look for primers containing zinc, which offers what's known as sacrificial protection—the zinc corrodes before the steel does.
Oils and Waxes: For items like hand tools or cast-iron cookware where paint isn't practical, a thin coat of oil or wax creates a moisture-repellent barrier. Grapeseed oil works great for seasoning cast iron, while products like boiled linseed oil or paste wax are perfect for protecting tools.
Clear Coats: If you love the look of bare metal but want to protect it from the elements, a clear enamel or lacquer provides a durable, transparent shield.
To help you decide, here's a breakdown of common coatings for different types of metal and their uses.
Protective Coating Options for Different Metal Types
Guide to selecting the right protective coating based on metal type, intended use, and environmental conditions
Metal Type | Recommended Coating | Durability | Application Method | Maintenance Required |
|---|---|---|---|---|
Mild Steel (Outdoor) | Zinc-rich primer + Epoxy or Polyurethane paint | High | Brush, Roller, or Spray | Minimal; check for chips annually |
Cast Iron (Cookware) | Seasoning Oil (e.g., Grapeseed, Flaxseed) | Moderate | Wipe on, heat to polymerize | Re-season as needed |
Aluminum (Marine) | Anodizing or Marine-grade epoxy primer | Very High | Chemical bath or Spray | Low; regular cleaning |
Stainless Steel (Indoor) | Wax or specialized stainless steel polish | Low | Wipe on, buff off | Frequent reapplication |
Wrought Iron (Fencing) | Alkyd Enamel or Oil-based paint | High | Brush or Spray | Touch up scratches promptly |
Tool Steel (Hand Tools) | Paste Wax or Boiled Linseed Oil | Moderate | Wipe on, buff off | Reapply every few months |
This table shows there's a specific solution for almost every situation. The key takeaway is to match the coating's properties—like durability and application method—to your project's needs.
Ongoing vigilance is crucial. A quick weekly or monthly inspection, especially for items exposed to the weather, can help you catch and treat tiny rust spots before they become a big problem again. This proactive approach ensures your hard work lasts for years. If you're curious about how modern tech is making this entire process easier, our overview of [laser cleaning in Canada](https://www.laserverse.ca/post/laser-cleaning-canada) explores methods that clean and prepare surfaces with incredible precision.
Ready to take your restoration projects to the next level with a damage-free finish? Explore the professional-grade laser cleaning services and equipment at [Laserverse](https://www.laserverse.ca) and see how we can help protect your most valuable assets.